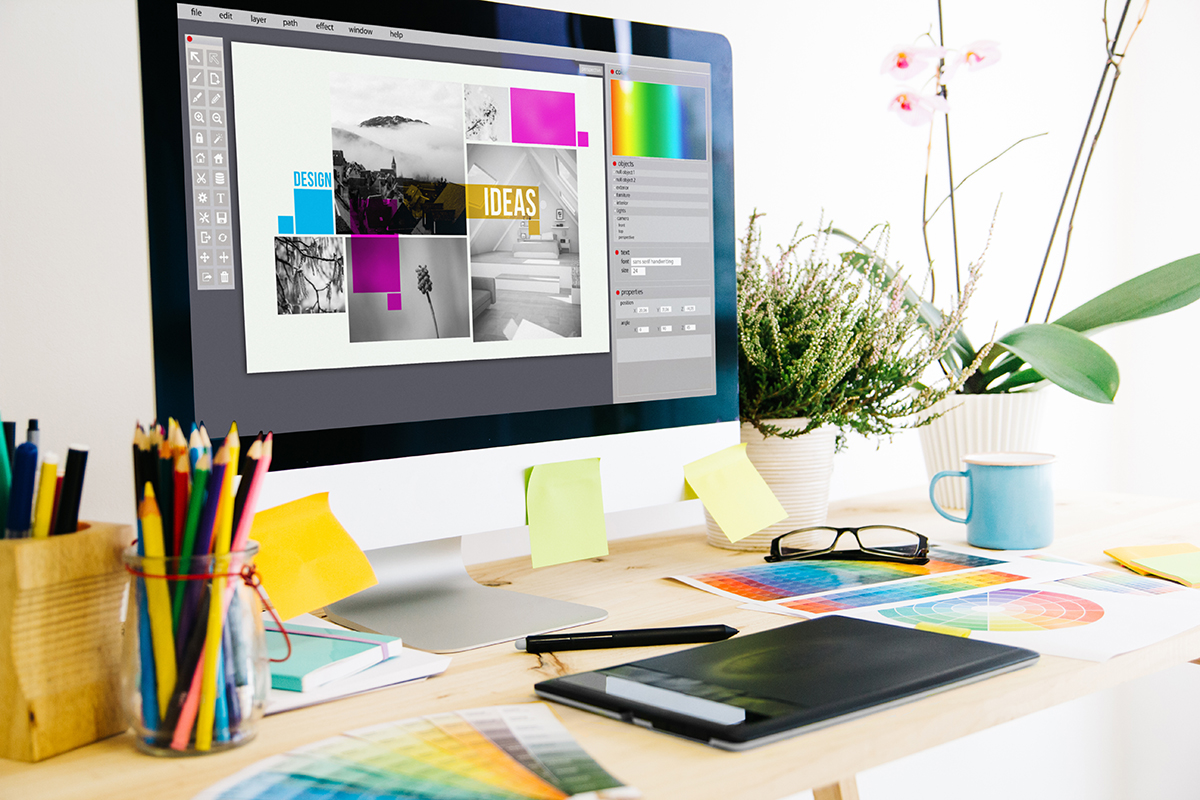
Getting Print-Ready artwork right
This is the main bugbear for both printers and customers, it can be a daunting task, even designers can have a hot-flush when they have to prepare artwork for print. With so many moving parts, checklists and details to keep in mind when it comes to getting your beautiful design ready for a commercial printer. But… fear not, we have put together a useful guide to cover the technical do’s and dont’s, tips and tricks and walk you through how to take a project from your computer to our printing press.
Before You Start
There are many different design software packages to choose from these days. Gone are the days when customers send artwork produced in Microsoft Word and expect things to just work out. Below are some software packages that we have experienced and can safely say they work rather well.
Adobe InDesign
Our chosen design application, it is perfect for creating print ready artwork, using high-resolution graphics and producing pixel-perfect print ready PDF files. The one draw back to InDesign is, it is not the cheapest package available, prices are from around £20 per month, the other issue is when you first open it up, it may be a little daunting and a steep learning curve to get to grips with it.
Adobe Photoshop
We have lots of customers who use Photoshop to design their leaflets, business cards without much issues. The key is to get the page size right, the colour mode right and the resolution right before you start any designing. Photoshop is primarily used for photography and image editing, it does this superbly, it isn’t our recommended choice for designing a leaflet as it creates an image and isn’t quite as easy to start changing things if you get it wrong.
Apple Pages
If you are a Mac User then this may be a tempting solution, the chances are, you probably use this already for little design jobs, social media graphics etc. Well, we have had varying degrees of success from Pages, it is perfectly fine if you plan to print it on your home / office printer, not quite so good for the commercial printer.
Canva.com
This is probably what we would recommend. We haven’t actually used it ourselves, but many customers have and they have described how easy it is to get to grips with, they also have a whole bank of different templates to get your creative juices flowing. It is definately worth a look. Especially as there is a FREE option which seems to work perfectly well.
It’s all in the detail
You have chosen the design package and a raring to go… well have a think about what it is you are designing and get the page size right.
It is no good designing a beautiful business card on an A4 page, or designing something portrait when you want it printing landscape. There are some other things to think about too, BLEED!
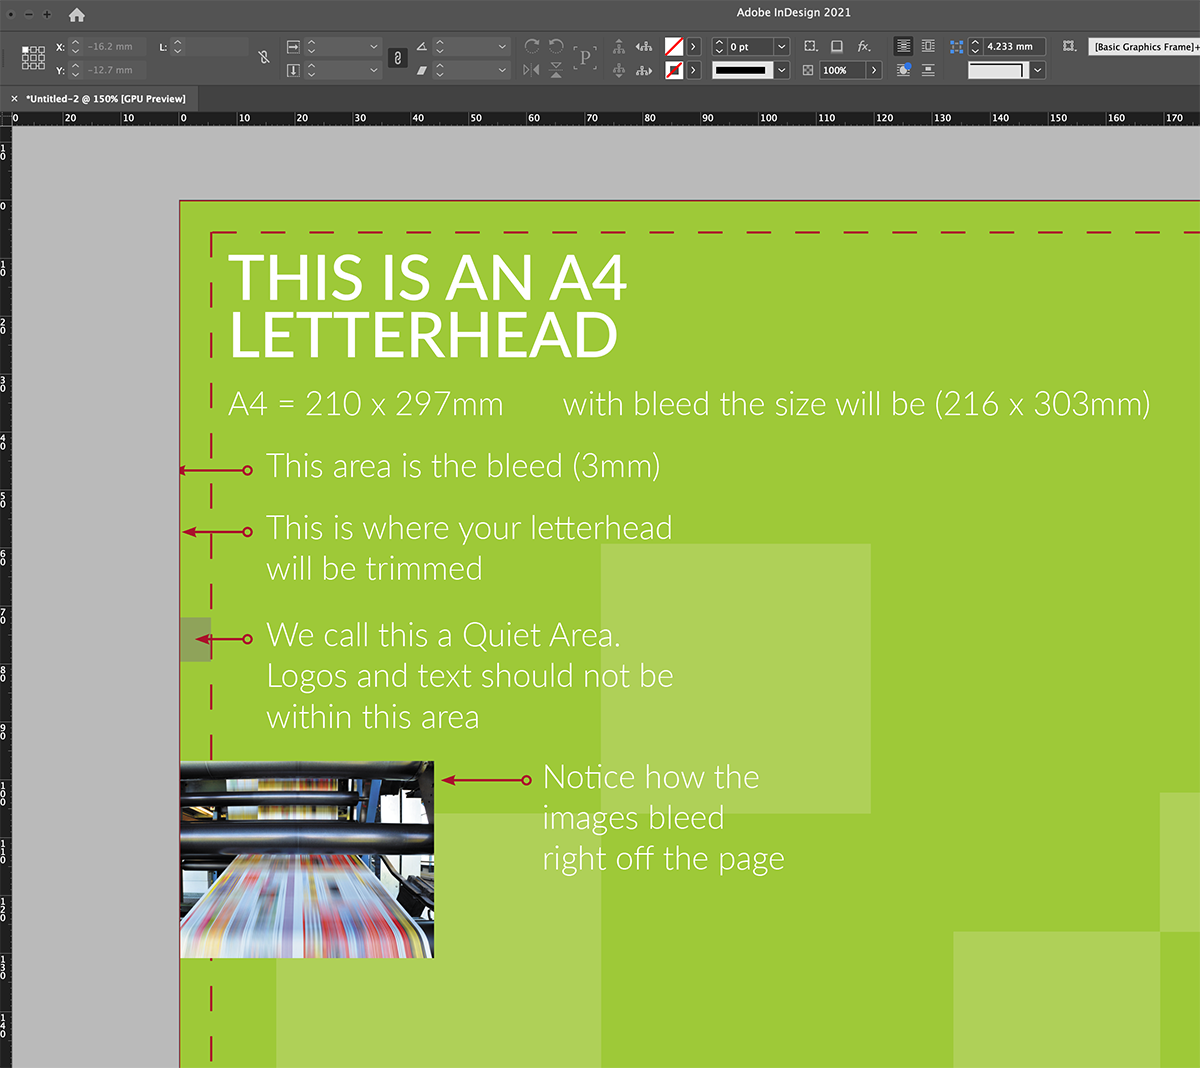
What is Bleed though?
This is our 2nd biggest problem and again it can be complicated when asking customers, can you resupply your artwork with bleed. What do we exactly mean?
Well in order to explain this, first we need to show you how we produce your printed document. In this example we are going to take an A4 letterhead, the standard UK size this is 210mm by 297mm, that means when you get your letterheads delivered, this is the size they will be. So, what page size should you use in order to produce this?
210 x 297mm… No. Although this is the size they will be when produced, we actually print an extra 3mm on all the edges meaning the size of your digital page needs to be 216mm x 303mm (210 + 3 + 3) x (297 + 3 + 3). You document is then printed on huge sheets of paper and stacked, so your job are likely to be in a stack of 500 or 1000 sheets high and sent to our finishing department. Here these are placed on a guillotine and they are trimmed down to 210 x 297mm, so we remove 3mm from each edge, this means that any photographs bleed all the way off the edge of the paper and ensure that when you receive your printing, you don’t have a nasty white edge around any image.
So, we can then take this theory to any size document, Business Cards, finished size 55mm x 85mm, so your digital page when you set-up your artwork needs to be (55 + 3 + 3 = 61mm) and (85 + 3 + 3 = 91mm)
Most artwork packages don’t require you to do this calculation and when you set up your page size, it normally asks if you want to add bleed. In this case a business card should be entered as 55 x 85mm and then in the bleed box, add 3mm (to all edges), this then creates your artwork for you ready to start your design.
What do we mean by a Quiet Zone (Quiet Area)?
We are not talking about a train carriage… this means the edge around your page. You must have received leaflets through your post where some of the text is missing, in theory this text has been trimmed off, probably because, the artwork didn’t have any bleed and because text had been put too close to the edge so has been trimmed off when in the guillotine.
Lets go back to that letterhead again… finished size 210 x 297mm, your artwork is supplied to us 216 x 303mm, we then loose 3mm off each edge when we trim these. So… the quiet zone, ie (important elements of your design, such as logos, text) should be about 8mm from the edge of your digital page artwork, this ensure that once your file is printed, nothing important is going to get trimmed.
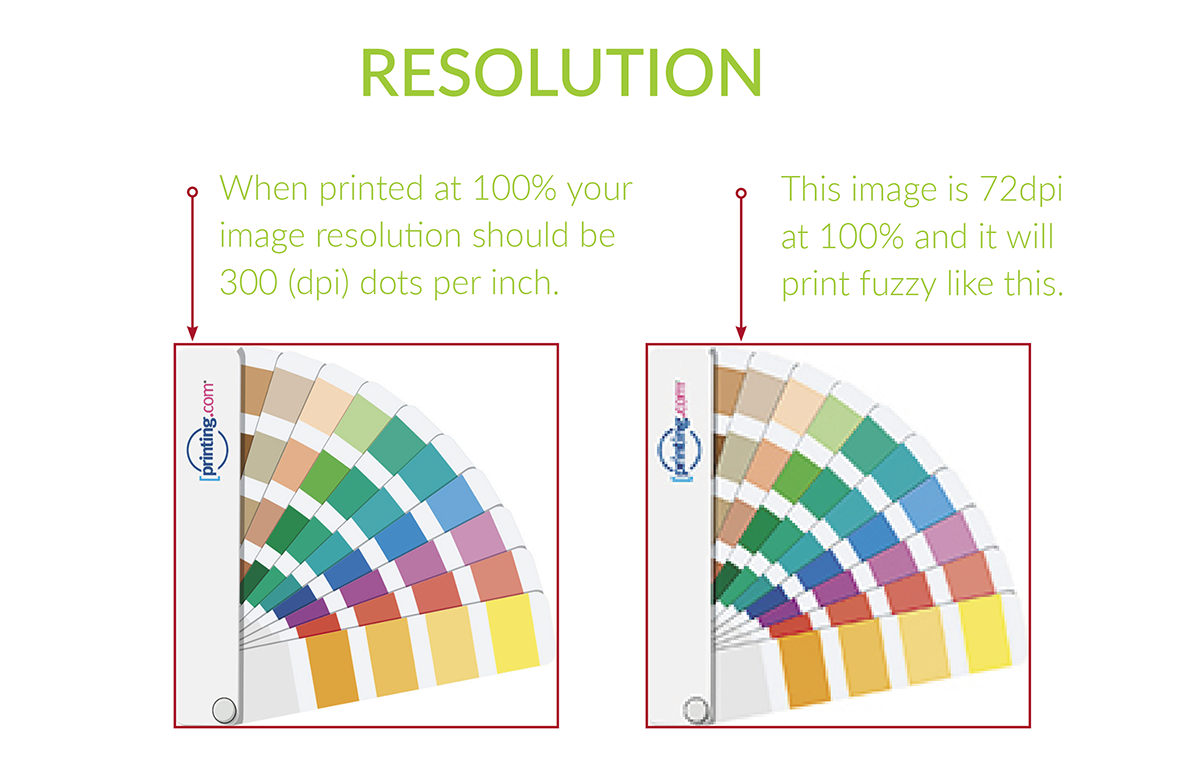
The resolution of your images
Okay, a printers biggest bug-bear is the quality of images supplied by customers. This topic could have a blog of its very own, and maybe we will do later down the line but for now, we’ll try to keep this as simple as we can.
When we ask about the resolution of an image, we are talking about the images DPI (dots per inch) at it’s current size.
Many customers send us images they have sourced themselves from the internet, these is many problems in doing this, one of which, do you have copyright issues with the image and two; images used on a website have been compressed, this means that the file size is the bare minimum, the resolution is just 72DPI, this is fantastic for websites as they need to be small in order for them to load quickly. Graphics for print however, we don’t want small file sizes, we want BIG files sizes to ensure that your image, once printed, is crisp and sharp. We normally print at 300DPI, at actual size, this ensure the image print high-definition. A dot is basically a spec of colour (Cyan, Magenta, Yellow or Black).
So, how does this break down? For our example, I have copied an image I have found on our website, this image is 700 x 700pixels wide, the resolution of this image is 72dpi (so perfect for a website), the size this displays on your screen depends on your monitor. When it comes to printing this image however, there are a number of things we need to do. We need to change the colour mode from RGB to CMYK and then we need to adjust the resolution to 300 pixels per inch. When we change the resolution to 300DPI we in theory make the image much smaller, so the actual printable size of this image is just 59mm printed at 30DPI.
Another way we can look at this, is working in Inches.
If we take a 1 x 1″ image, for use on the web it only needs to be 72dpi there for you are looking at an image 72pixels x 72pixels. Whereas in print, that same 1″ x 1″ image needs to be 300 pixels by 300 pixels, meaning the size MUST be smaller when it comes to printing it.
Okay, not to bombard you with too many facts and figures here, at the end of the day, you need the largest file sizes you have available for your print project, getting images from the internet really isn’t an option if you want crisp and clear results.
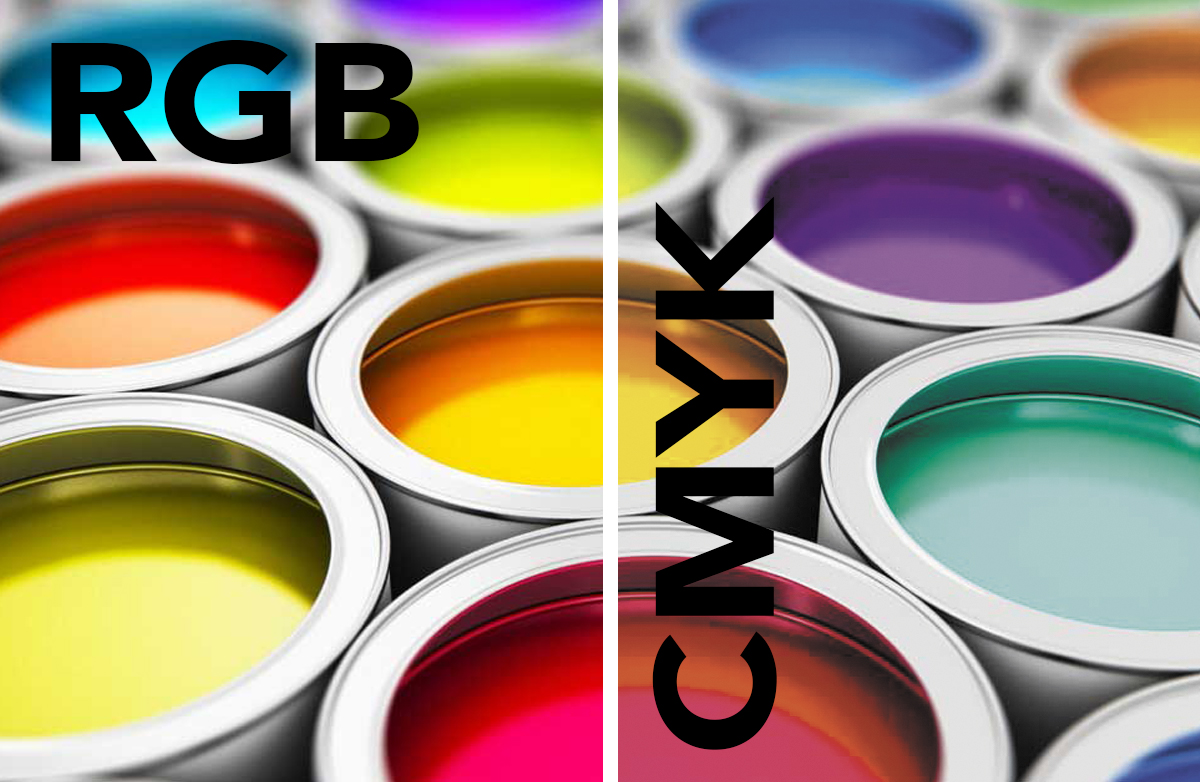
RGB vs CMYK
Next, lets talk colour, what you are looking at right now, is all in RGB (Red, Green and Blue), your television, your monitor and even colour lights or bulbs in your home, these all use RGB technology, many of these colours that you can achieve in RGB you cannot achieve in print. This is because when it comes to printing, we use CMYK (Cyan, Magenta, Yellow and Black) pixels layered on to the paper to achieve the desired colour. So, before starting out on any design ensure you are working in the right colour mode. Change this to CMYK.
The image you see above is an example of an RGB image compared to a image printed in CMYK.
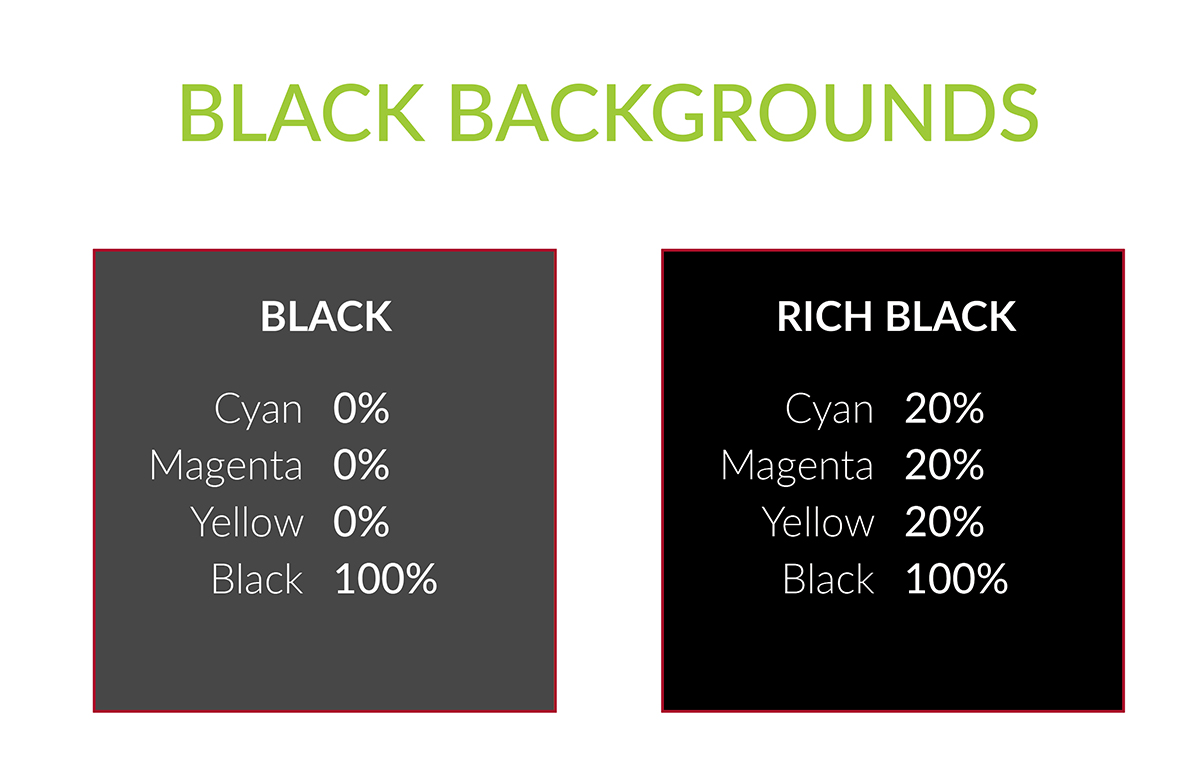
Solid black backgrounds
When printing with black color, there are two types of black you can use.
- Black – 100% Black: should be used for any text
- Rich Black – 20% Cyan, 20% Magenta, 20% Yellow and 100% Black: should be used when using blocks of black
The image above, you will see the difference between rich black and black.
It may be hard to tell the difference when preparing files on your monitor screen so always check any large solid areas of black ink before producing your PDF.
Proof Reading
This comes from experience, always proof read everything before sending us artwork, although we do check files are correct from a technical point of view, we don’t intentionally ready through all your copy for spelling errors. I find it helps to print your artwork out before you send it to us and read through the print out, don’t ask me why, but mistakes are often missed until you pick up the physical printed document in your hand. Pay particular attention to phone numbers, emails addresses etc.
Producing Print Ready Files
Once you have finished, proof read and checked everything through, it is time to produce a press ready PDF file. There are a few things you can do to obtain the best possible results.
- Outline all the fonts before producing a PDF.
- This is possibly called different things depending on your software, but look for ‘Export’ this should then give you a selection of different formats – you want to choose PDF (press ready / high quality)
- Marks & bleed options. There should be an option to add bleed and crop marks.
- Compression – if you see any compression options, just check that any images are not compressed below 300 pixels per inch.
- Click Export.
- Check the PDF you have created, ensure it matched your artwork.
All too daunting?
That’s why we are here. Before you set about with any design, you are free to give us a call first, we could email you a template so you can design over it to ensure it is correct from the start. If you want to discuss anything mentioned in further detail then get in touch on 01524 846222 and we’d be more than happy to help.
If this still isn’t for you, then we are Graphic Designers, with over 20 years experience in designing for print, so simple drop us an email with your brief or what it is you are looking for and let us take the stress out of producing your design.